Thursday, February 22, 2018

Pop Up Flowers

A warm Hello to you.  Today I am featuring a pop out card  from the newly release Pop Up Dies from Cheery Lynn Designs. I have chosen to use the Flower.


For the front of my card I used a piece of pattern paper and popped up the flowers cut from the Pop Up Flowers. I then layered the Whimsical "Be Happy" Die - B787 above them.


This is the inside of the card and shows how nicely the flowers pop up when you open the card. This is a very cool effect and will take anyone's eye and make them smile when opening the card. 


Here is a close up of the flowers popped up. The flowers and sentiment were all cut in white and inked with distress inks. I do hope you get a chance to buy and play with these pop up dies. Cheery Lynn Designs has a nice selection of these Pop Up dies and they are so easy to use. Bonnie our team leader has made five video's on these and you can watch them by clicking on this link. https://www.youtube.com/user/reasonableribbon/videos. So pour yourself a coffee and enjoy the videos. Have a crafty day my friends. 

Dies Used
Pop Up Flowers - 1 Piece Die Set - B936
 Whimsical "Be Happy" Die - B787

Monday, February 12, 2018

Celebrate with Roses

A warm hello to you. Glad to see you here. It is Debbie with you  from Debbie's time out. Today I am sharing a card with you combining the Step Card die with the Pop Up "Celebrate" die. 


I started  with the A2 Fancy Step Card as my base. I cut the Pop Up Celebrate  from a piece of flowered paper and layered it to the center of the step card. The "Celebrate" was inked up with distress inks.  I cut a piece of flowered paper to fit behind the scrolls of the step card. 


Here I lave layered three different die cut outs to the center of the step card. The Fleur De Lis Square DoilyDusty Miller Square and the Vintage Tile in that order.


Next came the flower arrangement. All were cut in white and inked with distress inks. I placed two of the  Tiny Fanciful Flourish on two corners opposite each other. The then created a rose using the medium- Rose and the Tea Rose small. I added a couple of yellow Darling Daisies  to each side of the rose. I cut and used the Branch as greenery around the flowers. This is a simple card to make  but with the fancy step card and the dies I choose to use it turns out to be a very elegant card that anyone would love to receive.  Until next time have a crafty day my friends.

Dies Used
A2 Fancy Step Card Kit 8 Piece Die Set - B570
Pop Up Celebrate Word - 1 Piece Die Set - B934
Fleur De Lis Square Doily 2 Piece Die Set - DL318
B886 Vintage Tile - 1 Piece Die Set
B884 Dusty Miller Square - 1 Piece Die Set
medium- Rose 7 Piece Die Set - B154
Tea Rose small- 6 Piece Die Set - B435
Darling Daisies 4 Piece Die Set - A196
Tiny Fanciful Flourish Right & Left 2 Piece Die Set - B387
Branch 2 Piece Die Set - B466

Thursday, February 8, 2018

Journey Scrapbook Page


Journey Scrapbook Page


I started with a 11x11 brown base.  I layered a 10x10 patterned paper onto the brown base. I tore a V shape on the right side of the pattern paper and rolled the paper back. To the center I created three layers 4.5 x 6.5 in brown, 4.25x 6.25x in tan and then cut a panel from the Camelia Carnation paper pack down to 4x6 and layered it in place of a photo so this would make a cover scrapbook page for a travel album.  I layer a 1” brown border along the bottom to ground the car. One tag was tucked behind the border and one tag on top of the border. Both tags were popped up at the top to create dimension.  I stamped, die cut and inked up the car with blue distress ink. I put clear Nuvo on the windows to make it look like real glass and also on the hub caps to make then stick out a bit. I colored the flowers and greenery in the car with copic markers and added a bit of glitter to the flowers. The flowers I created were cut from the camelia carnation on foam paper and then inked up with distress inks. I then heated and shaped them adding a pearl to the center of the bigger ones. The greenery was also cut from foam paper. I used the die from the simply classic set for the greenery. Next I stamped Journey onto the background paper also from the simply classic set. I then stamped journey again on white paper , then die cut it out and inked it up with some blue and purple. I created a flower arrangement near the torn V shape and also added a some flowers and greenery  around the sentiment Journey.  I tucked some leaves behind one of the tags. I added some blue and purple ink to the butterfly, tags and background paper.

Happy Mother's Day

Happy Mother's Day


I used the Camelia Carnation paper pack to create this card. The base is the paper with the tea cup and spoon from this pack. The size is 5.5 x 7.5. I cut a pocket in white from the Fleurs Border and Pockets set and placed it in the bottom right corner. I tuck two tags into the pocket and popped them up at the top to give dimension. The Happy Mother’s Day sentiment was cut from the paper and place across the tags. I created four roses from the Classic Rose set. I stamped the roses in black and inked them in pink with distress ink.  I spritzed the with water and shaped them with the tool shaping set. When dry I glued, shaped and layered them to create a rose. I place three of them over some of the flowers in the tea cup and placed the last one on the pocket. I tucked a few leaves behind the roses from the classic rose set.  I color two of the smallest rose pedals in blue and placed them near the bottom of the tea cup. Three pearls were added to the top of one tag and to the two blue flowers.

Altered Post It Note Clip Board

Altered Post It Note Clip Board


Altered Post It Note Clip Board
I started with a house shaped clip board made of wood. I removed the clip from the top and covered the board with a sheet of paper from the Camelia Carnation paper collection. I place the paper so the fancy rail was along the bottom. That way the humming bird would have a place to perch.  The paper was glued onto the clip board and then trimmed with a exacto knife. I screw the clip back on the board and clipped a post it note pad under it. I stamped the hummingbird in black, colored it with distress inks and cut it out. I popped it up on the railing. I stamped and colored the orchids with distress ink to match the post it notes . I spritzed them with water and shaped them with the flower shaping tools.  After they were dry I glued and assembled them. One was layered to the orchid plant that the humming bird is perched on and the others were layered onto the orchid plant  . A couple of buds were layered near the top of the post.

Wednesday, February 7, 2018

Pretty Pink Antique Card.


Just playing with some Heartfelt Creation stamps and dies. This card was created using the Camelea Carnation paper collection and the Young At Heart stamp and die collection.  Scroll down to see a few more Heartfelt Creation cards.

Hummingbirds Just a Note

This card was created with Heartfelt Creations stamps and dies.

Happy Birthday

This card was created using the Young At Heart Collection from Heartfelt Creations.

Antique Truck

This card was created using Heartfelt Creations Simply Classic Collection.

You Brighten My World


This card is created using Heartfelt Creations Camelia Carnation Collection.

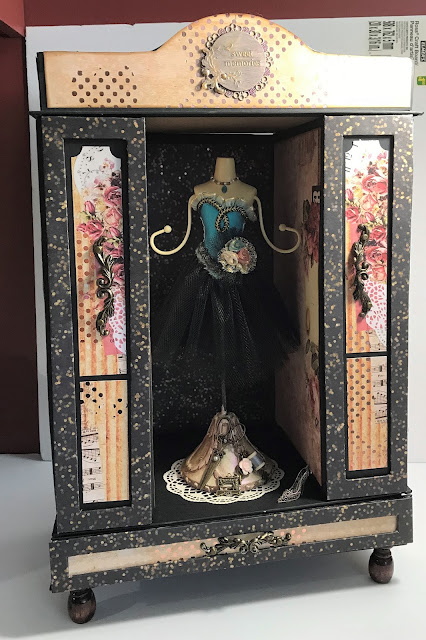
Wardrobe

 This is a vanity I created from one of Kathy King's tutorials. There is a album in one side and a privacy screen in the other side.
Here is the album and privacy screen in front.

Vanity


This is a vanity created from one of Kathy Kings Tutorials. This one was a lot of fun finding and collecting the minitures to set on the vanity.

Memory Box

This is the memory box from one of Kathy King's turorials.
The lid lifts up and the top half folds out for a writing slope. There is a file system at the back of the box. there are  two lids that lift up on the writing slope. One at the back and one at the front. They hold photo albums.
This is the front drawer in the writing slope with two smaller albums in it.
There is a bigger photo album in the back drawer.

Find Your Wings and Fly Book

This is a book I created from chipboard from one of Kathy King's tutorials.
This is what it looks like when you first open the book. When you lift the right side out there is a album and file system inside.
Here is a photo of the album and file system that store a large amount of photos.

Storage Box and Three Albums


This is a three album set that I created from one of Kathy Kings tutorials.

Rose Album

This was a bare wood photo album. I altered it using gesso, gelato's, stensils and inks. I place a photo of a rose in the oval opening.

Friday, February 2, 2018

Be my valentine.

Hi This is Debbie from Debbie's Time out with you today. I am sharing with you my man's valentines card.


I started with a woodgrain base matted in black. I used the Pop Up Hearts on top.  I layered the Burlap Border  at a angle and then placed the Cool Beans  mug and Be My Valentine Heart  on top. I turned the big heart on top into a face using the Men's 4 Piece Die Set. Last I layered a couple small hearts with sentiments from the Sweetheart Candy  set.

Thank so much for visiting the blog today. Have a crafty day

Dies Used
Burlap Border Die - B312
Pop Up Hearts - 1 Piece Die Set - B933
Sweetheart Candy 8 Piece Die Set - B675
Be My Valentine Heart Die - B531
Cool Beans - 3 Piece - B903
Men's 4 Piece Die Set - CABD65